




DeepSeek Harness Access to B.AI API Official Configuration Guide

 This guide will provide you with a detailed demonstration of how to start DeepSeek Harness from scratch in Windows, macOS, and Linux environments, and successfully integrate it with the B.AI API.
DeepSeek Harness is a highly anticipated open-source AI workspace application currently in the developer preview stage. It not only assists in code and file analysis within the local workspace but also provides developers with great flexibility through an open custom Provider mechanism. B.AI, as an advanced AI infrastructure, has created a full-stack large model service platform that integrates high availability and low latency, dedicated to building a powerful, stable, and highly resilient intelligent computing network for developers and enterprises.
This guide will demonstrate in detail how to start DeepSeek Harness from scratch in Windows, macOS, and Linux environments and successfully integrate it with the B.AI API. By following this tutorial, you will establish a complete closed-loop call from the local workspace to the large model, fully unleashing the production and innovation potential driven by AI.
The final call chain achieved: DeepSeek Harness → B.AI API → Models provided by B.AI
1. Prepare the Environment
DeepSeek Harness is launched via npx that comes with Node.js. Please ensure that your system has the current available LTS version of Node.js installed.
Official download link: https://nodejs.org/en/download
Windows
You can directly download the .msi installation package or search for PowerShell in the start menu, open it, and run the WinGet installation command.

macOS
Select the macOS Installer on the official Node.js download page, download the .pkg file, and follow the prompts to complete the installation. After installation, press Command + Space to open Spotlight, type Terminal, and enter the terminal.
Linux
Please select your Linux distribution and system architecture on the official Node.js download page and install the LTS version according to the package manager commands provided on the page. Since the installation commands vary for different distributions like Ubuntu, Debian, Fedora, etc., it is recommended to follow the commands dynamically generated on the official page to ensure a smooth installation process.
After installation, close all currently opened terminal windows and open a new terminal (Windows users should use PowerShell, macOS users should use Terminal, and Linux users should use the system terminal).
In all three systems, run the following set of check commands:

If all three commands return version numbers, it means the environment is ready.

If you plan to build and run the project from the GitHub source code, you will need a Git environment. Please run git --version in the terminal to check if it is installed. If not installed, please execute the following commands according to your operating system:
Windows

macOS

Ubuntu or Debian

Note: If you only plan to quickly experience and configure B.AI using npx, you can skip Git.
2. Start DeepSeek Harness Using npx (Recommended)
For developers using and configuring the B.AI API regularly, it is recommended to start directly with npx.
Run the following command in the terminal (common for all three systems):

On the first run, the system will ask if you want to download the required packages; enter y and press Enter to confirm.

If dependency deprecation warnings appear during the startup process, it is normal and does not require intervention.

When the terminal outputs the local address, it indicates that the Web service of DeepSeek Harness has been successfully started.

Keep the terminal window open, then enter the following in the browser address bar:

This address is only accessible from the local machine. If you close the terminal window or press Ctrl+C in the window, the local service will stop. If the browser cannot open 127.0.0.1:3080, please first check if the terminal is still running and confirm whether the above dsh web address has been output in the terminal. If necessary, please rerun the startup command.

3. Source Code Build Method (Advanced)
If you plan to develop plugins, modify the source code, or participate in project development, you can also obtain the source code from the official GitHub repository.
Official repository: https://github.com/deepseek-ai/deepseek-harness
Please note that GitHub provides the project's source code, and after downloading, you must complete dependency installation and project building through the terminal; you cannot run it by double-clicking the file. You can obtain and run the source code in the following two ways:
Method 1: Download ZIP Source Package Click the green Code button on the repository page and select Download ZIP. After downloading and unzipping, open the terminal, use the cd command to enter the unzipped project directory, and run the following commands in sequence:

Method 2: Clone using Git It is recommended to run git --version first to check if the Git environment exists. If not installed, please refer to the "Prepare the Environment" section above to complete the Git installation for your corresponding system. After confirming the environment is correct, reopen the terminal and run the following command:
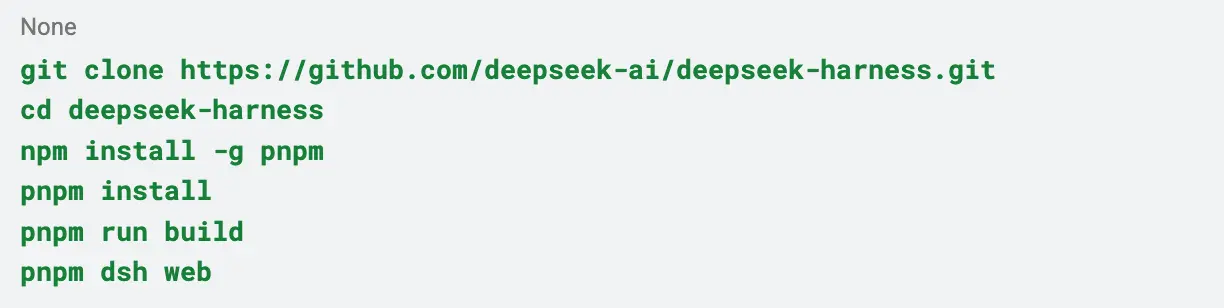
Whether using ZIP or Git, after successfully building and starting, the access address is also http://127.0.0.1:3080.
4. B.AI Custom Provider Configuration
Step 1: Skip the Official Default Configuration: When you first enter DeepSeek Harness, the system will pop up a window to fill in the API Key for the official model. Please be sure to click "Configure Later." If you enter the B.AI Key here, the system will not be able to recognize it correctly.
Step 2: Enter the Custom Configuration Page: Click "Settings" in the lower left corner of the page, select "Models" from the left menu, and click "Add Custom Provider" on the right. Note: At this point, the official Provider showing a red dot is normal and does not affect subsequent operations.
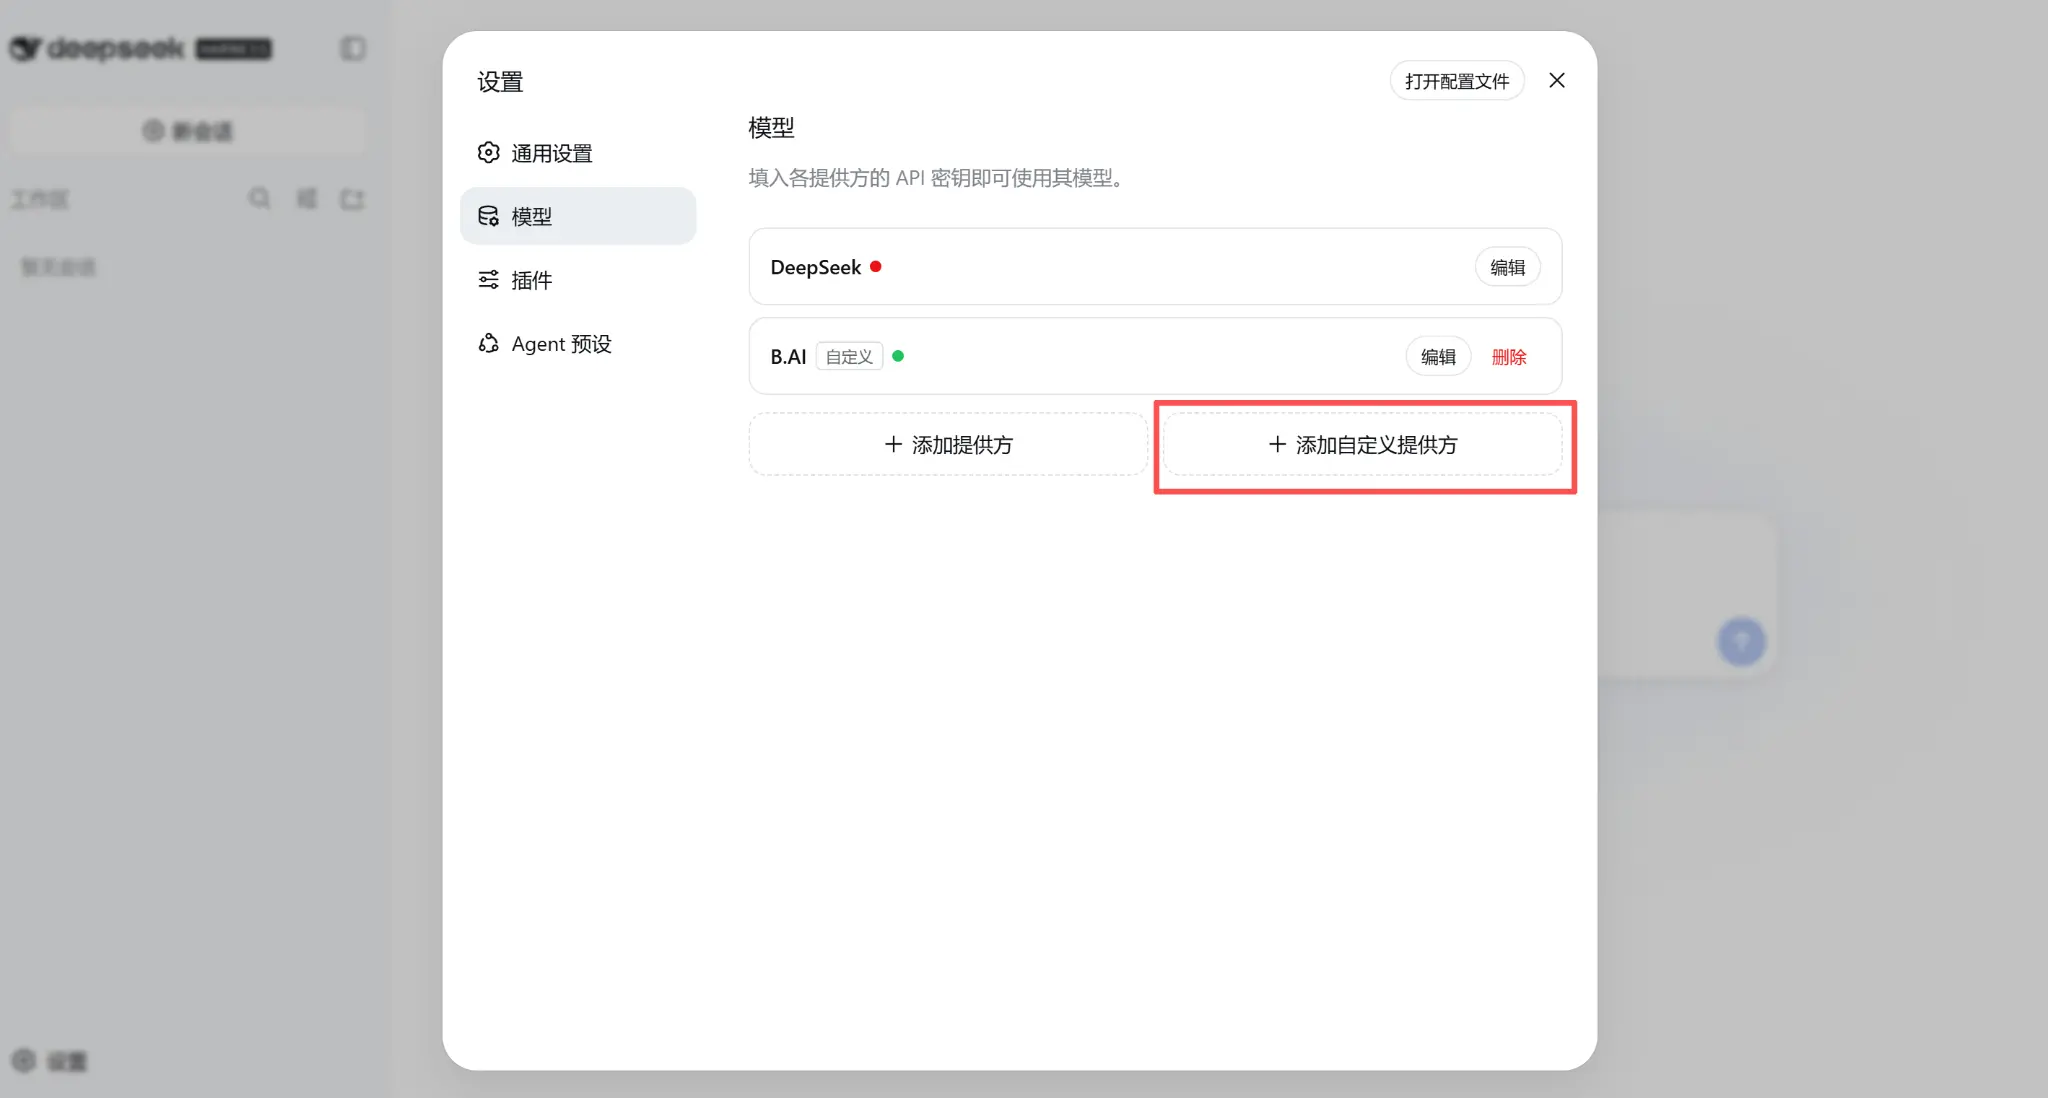
Step 3: Fill in B.AI Interface Information: After opening the custom provider, fill in the content as below.
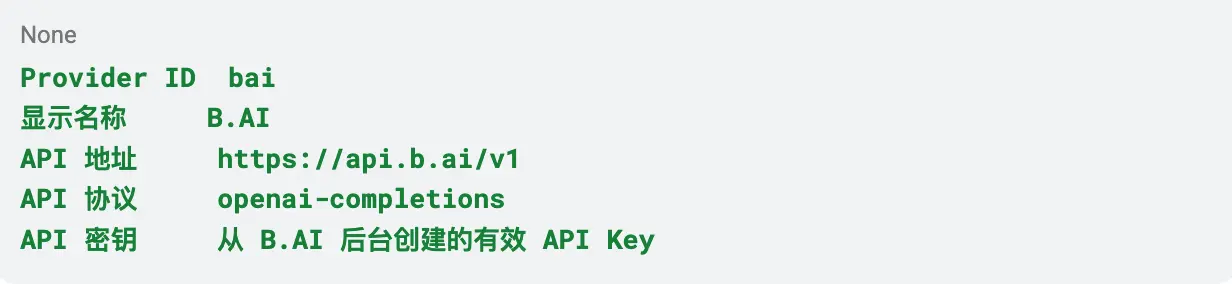
Step 4: Obtain Model Directory and Complete Provider Creation: After filling in the basic information, please scroll down to the "Model Directory" area. The system provides two ways to add: click "Add Model" to manually fill in the model ID, or click "Get Available Models" in the upper right corner.
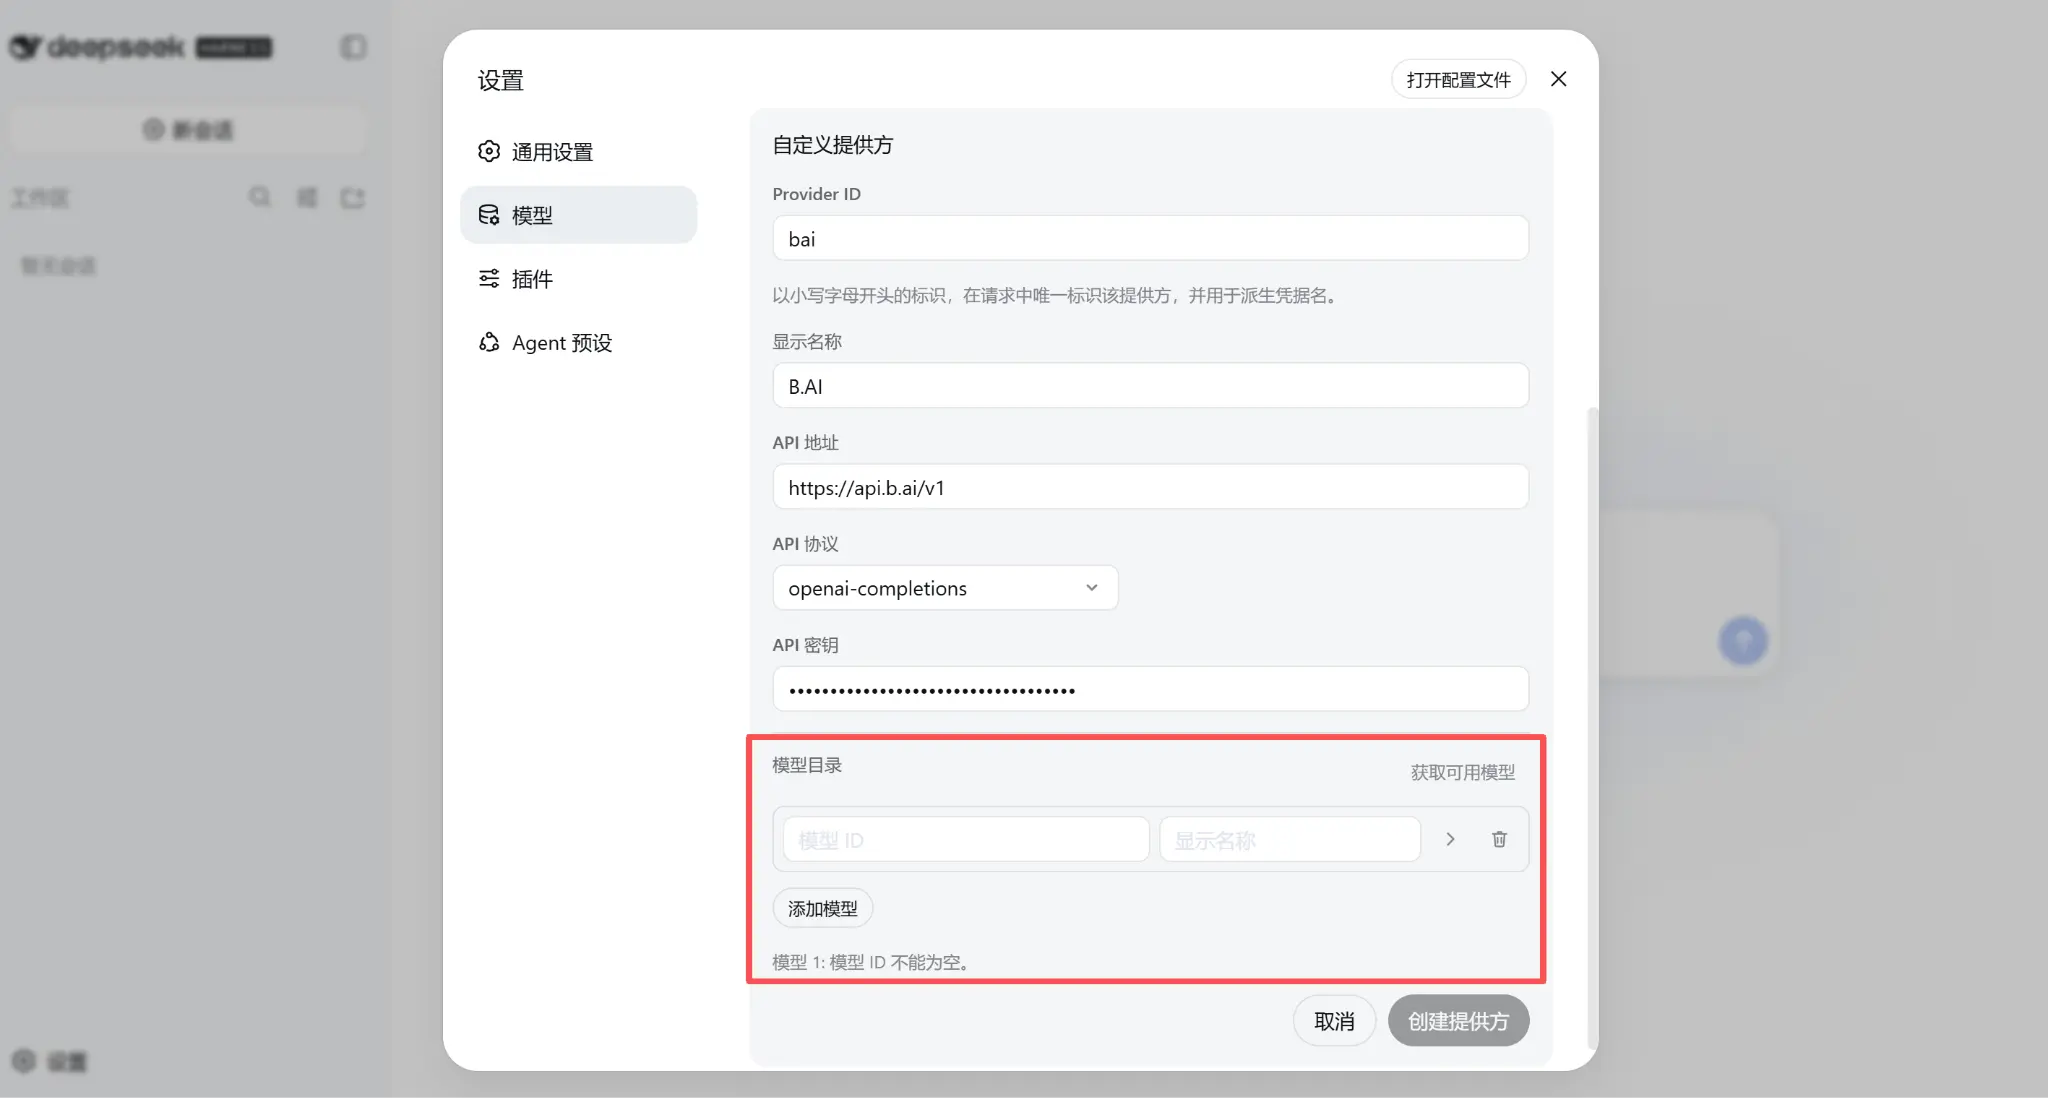
Recommended Action: First, click "Get Available Models." Let DeepSeek Harness directly request the current account's available model directory from B.AI. If the model list returns normally, it proves that the B.AI API Key, https://api.b.ai/v1, openai-completions protocol, and model directory interface configurations are successfully connected.
Model Selection and Addition Notes:
In the returned list, check the currently available DeepSeek models from B.AI (examples include deepseek-v4-flash or deepseek-v4-pro; please note: the specific available models will dynamically change based on account permissions and time, so please refer to the actual returned results).
Do not modify the model ID: The model ID must exactly match the directory returned by B.AI. Do not change any uppercase, hyphens, or version numbers arbitrarily, otherwise, it is easy to trigger a model not found error in subsequent calls.
After confirming that the model has been added correctly, scroll to the bottom of the form and click "Create Provider."
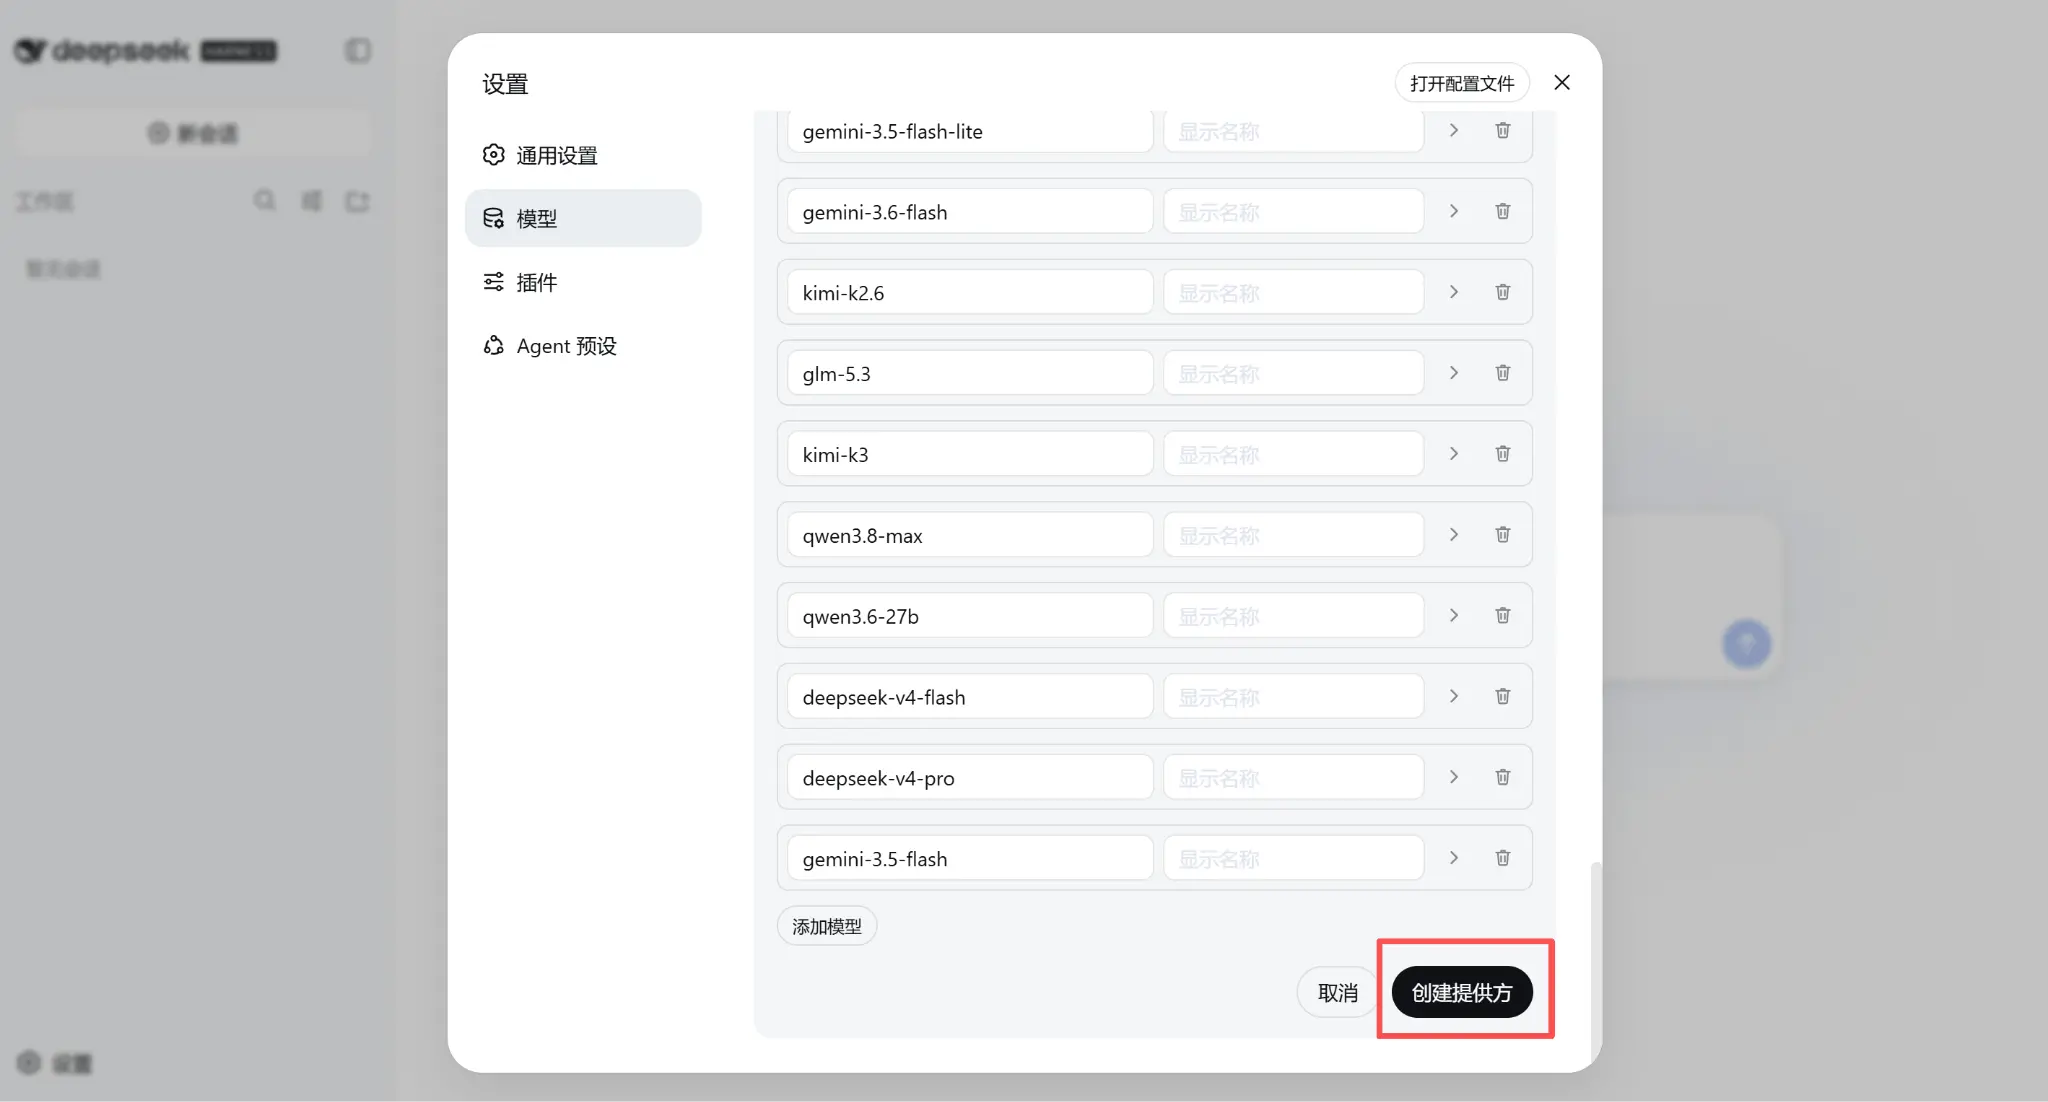
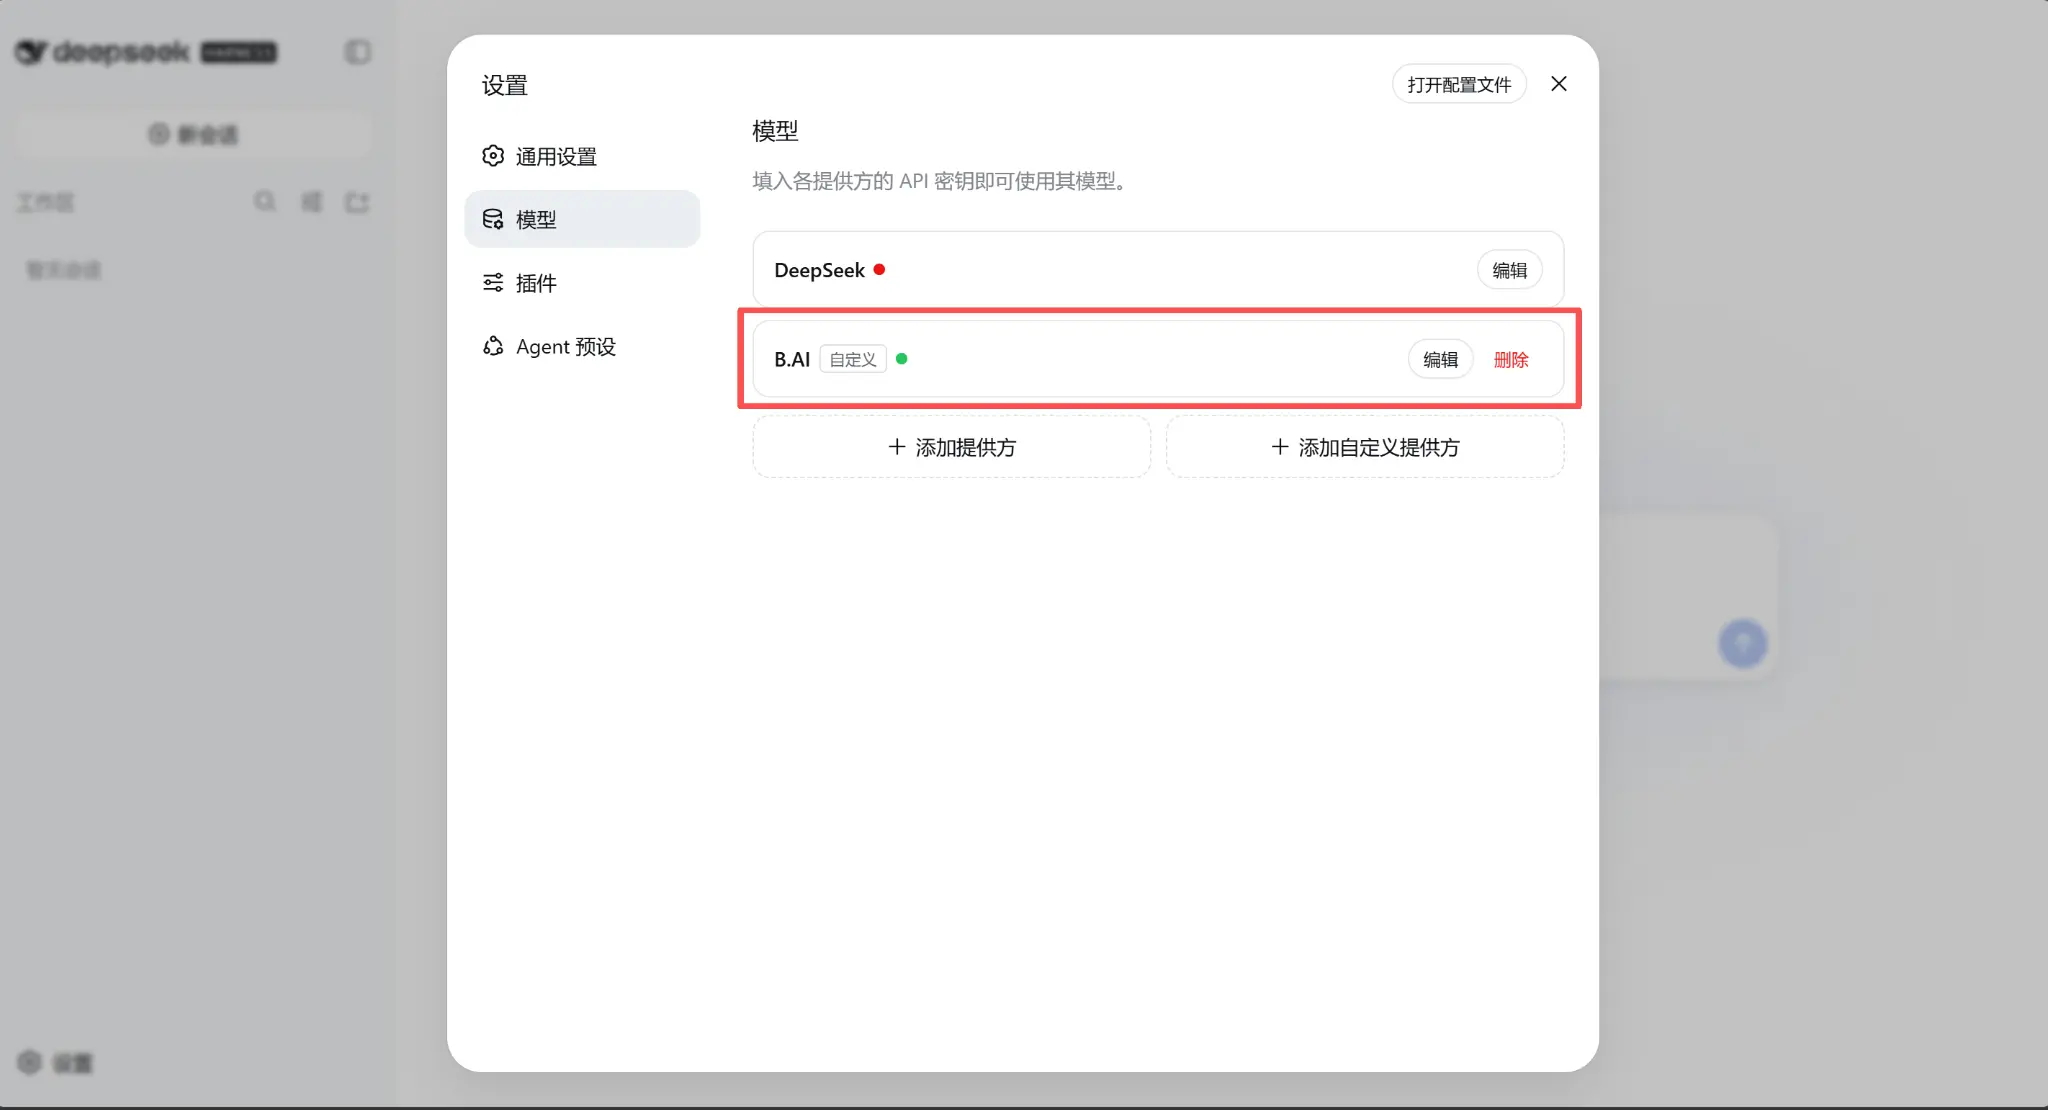
After successful creation, the settings page will add a custom Provider named B.AI, with a green dot displayed next to it. This indicates that the B.AI custom Provider has been successfully saved and is in an available state. Note: If the DeepSeek official Provider still shows a red dot at this time, it is due to the absence of the DeepSeek official API Key, which does not affect the normal use of the B.AI interface corresponding to the green dot.
Step Five, Link Connectivity Verification: Close the settings window and return to the main interface to create a new session. In the model selector, select the B.AI Provider, then choose the DeepSeek model just added to conduct the following tests:
- Basic Conversation Test: In the model selector, select B.AI and the corresponding model, and send the command:

Observe whether it can return content normally, whether there is streaming output, and confirm that the current Provider is B.AI, and the model ID matches what you selected.
- Tool Invocation Test: Send a read-only command to verify the tool link:

The command specifically emphasizes "do not modify or delete any files" to safely and quickly verify whether the tool invocation link of Harness is smooth without changing the current workspace.
During the execution of the above two tests, please check the terminal window running DeepSeek Harness to confirm that the console does not show 401, 404, model not found, or other request error messages. If the terminal runs smoothly, you have successfully completed all access and verification work.
Frequently Asked Questions Q&A
Q1: The terminal prompts that the node, npm, or npx command cannot be found?
This usually means that Node.js has not been fully installed, or the command path of the newly installed version has not been read by the current terminal. Close all terminal windows, reopen them, and run again.

If the command is still not found, return to the official Node.js download page to confirm that the current LTS version has been installed. Windows users can also check Node.js in the system's "Installed Applications," while macOS and Linux users can run which node to check the command path.
Q2: An npm warn deprecated message appears at startup, should it be addressed?
Please first confirm whether the following address appears:

If the address displays normally, it means the web service has started successfully. The deprecated warning in this test is a dependency deprecation warning and can be continued to use. If the terminal subsequently exits abnormally or does not output the local address, please troubleshoot based on the specific error message at the end of the terminal.
Q3: The browser cannot open 127.0.0.1:3080, what should I do?
Please first check whether the terminal window running dsh web is still open. Closing that terminal or using the Ctrl+C shortcut will terminate the local service.
If the service has stopped, please re-execute the startup command:

If the terminal prompts "port is occupied": please first end any lingering DeepSeek Harness processes, then retry.
Q4: Encountering a 401 Unauthorized error when calling the model, how to troubleshoot?
A 401 error usually indicates API Key authentication failure. Please check:
Whether the API Key is copied completely, with no extra spaces at the beginning or end.
Confirm whether the API Key is in an effective (not deactivated) state in the B.AI console.
Ensure the Key is filled in the correct configuration item: do not fill it in the "DeepSeek Official Provider" of the first pop-up, but must fill it in the corresponding B.AI interface under "Settings → Models → Add Custom Provider."
Q5: Encountering a 404 Not Found error when calling the model, where is the error?
Please check whether the API address is filled in completely.

Q6: Prompting model not found, how to resolve?
Please return to the editing page of the B.AI custom Provider and click "Get Available Models" again. Ensure that the selected or filled model ID exactly matches the results returned by the system, strictly retaining all uppercase, hyphens, and version numbers. Additionally, account permission updates or official model directory adjustments may also cause old models to become unavailable; if errors occur, please always refer to the current model list obtained again.
Q7: The B.AI status shows a green dot, but still cannot converse?
The green dot only indicates that the configuration information has been saved. If conversation is not possible, please confirm that the current session has correctly selected the B.AI Provider and the corresponding specific model, that the model ID is accurate, and that your B.AI account has the calling permissions and available quota for the corresponding model. Then, please combine the last error code from the terminal (such as 401/404) for targeted troubleshooting.
Q8: Will there be differences in the access pages for Windows, macOS, and Linux systems?
The preparation environments for the three systems are slightly different. After dsh web starts, all systems access http://127.0.0.1:3080 via a browser, and the steps for adding the B.AI Provider, obtaining models, and verifying conversations are basically the same.
Reference Links:
Official Node.js download page: https://nodejs.org/en/download
DeepSeek Harness official repository: https://github.com/deepseek-ai/deepseek-harness
B.AI API documentation: https://docs.b.ai/llmservice/api/
 Risk warning Risk warning