




Create a dedicated AI platform, WorkBuddy integrates the B.AI model comprehensive tutorial

 Quickly integrate WorkBuddy with the B.AI model, seamlessly accessing top AI capabilities to help you rapidly create a personalized intelligent development workflow.
In today's fast-paced development environment, WorkBuddy has become an indispensable "productivity hub" for many developers on the desktop, thanks to its flexible workflow orchestration and powerful system-level integration capabilities. It not only aggregates fragmented development tools but also serves as a dedicated intelligent platform, allowing developers to directly invoke top-tier AI capabilities in an immersive environment without the need to switch contexts, significantly reducing the friction of executing daily tasks and allowing core focus to return to high-value thinking and creation.
To help developers more efficiently integrate B.AI's high-performance model matrix and system-level infrastructure into their daily development workflows, this article will provide detailed guidance on how to add B.AI custom models in the WorkBuddy desktop application. Before configuration, please prepare your WorkBuddy account, B.AI API Key, and the model ID that is actually available for your current account. Next, simply follow the straightforward configuration in this article to unlock an extremely smooth AI collaboration experience locally.
1. Before You Start
Step 1: Install WorkBuddy
Visit the WorkBuddy official download page and choose the corresponding installation package based on your system environment. Users who have already installed WorkBuddy can skip this step. If you cannot find the "Model" or "Add Model" option, first select "Check for Updates" to upgrade your version.
Windows
The official page currently provides a Windows x64 (compatible with ARM64) installation package, requiring Windows 10 or higher. After downloading the installer, double-click it and follow the wizard to complete the installation, then launch WorkBuddy.
Note: If the system blocks the installation, please first confirm that the installation package comes from the official page, and then check the application name and publisher information in the pop-up. Do not bypass the check by closing Windows security protection.
macOS
The official page currently provides both Apple chip and Intel versions of .dmg, requiring macOS 12.0 or higher.
Choose the Apple chip version for models like M1, M2, M3, M4, etc.
Choose the Intel version for Intel processor models.
After opening the .dmg, drag WorkBuddy into "Applications," and then launch it from the applications folder. If you are unsure about the chip type, you can check "Chip" or "Processor" in "About This Mac."
Other System Notes
Currently, the WorkBuddy desktop application only supports Windows and macOS, and does not support Linux at this time. Additionally, considering the different functional scopes of mobile and HarmonyOS, all operations in this tutorial are based on the desktop version.
Step 2: Log in to WorkBuddy
On the first launch, click "Login" and complete the authentication as displayed by the client. The international version official documentation lists Google and GitHub OAuth. If the current client displays WeChat QR code or other entry points, follow the actual options presented by the client.
Step 3: Obtain B.AI API Key
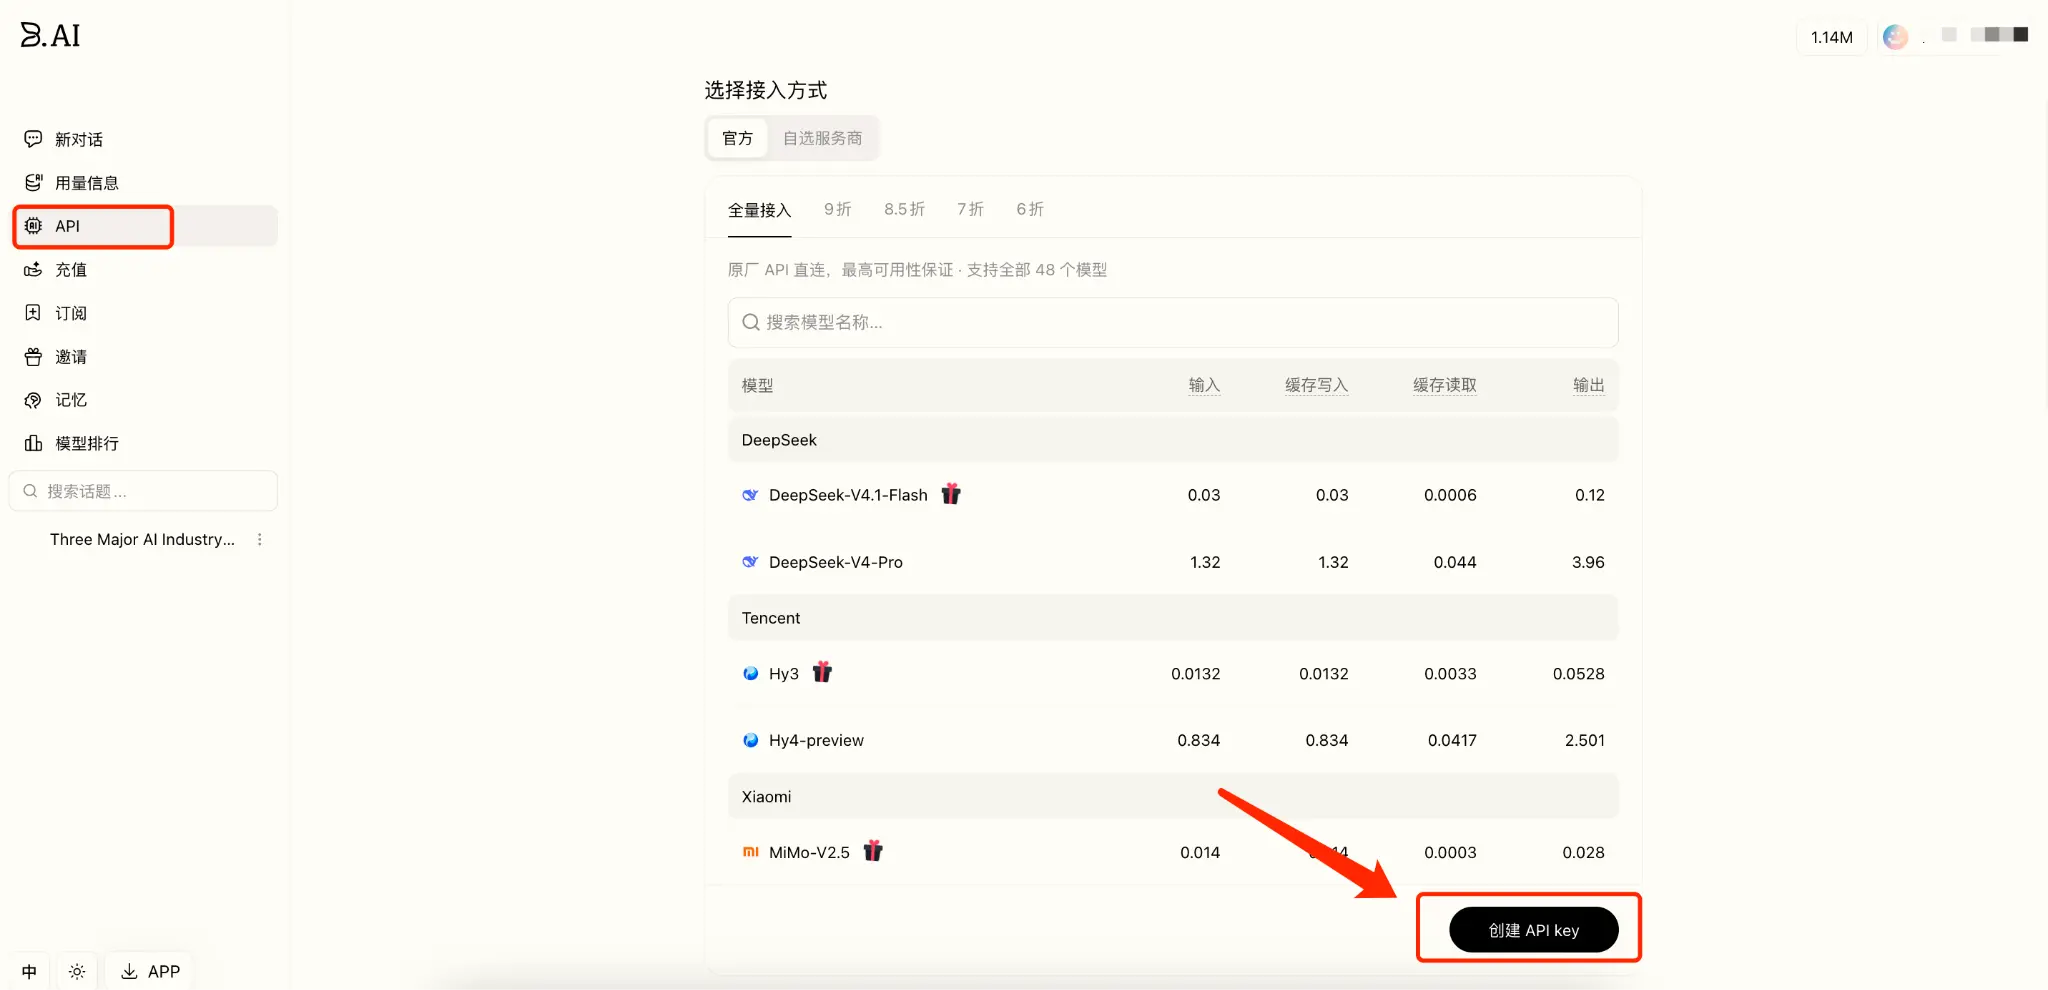
Please log in to B.AI first, then go to the API Management or API Key Management page in the left navigation bar, click "Create API Key," and set a recognizable name for it (e.g., WorkBuddy). Due to B.AI's official mechanism limitations, the complete Key will only be displayed once upon successful creation, so please be sure to copy and securely save it immediately after creation.
Important confirmation matters before configuration:
Preliminary Check: Please confirm that your account has available quota and that this API Key has permission to call the target model.
Model ID Acquisition: The model ID should be based on the return result of B.AI GET /v1/models or the current console list, and should not only refer to example names in other tutorials.
Protocol Compatibility: WorkBuddy custom models use the OpenAI Chat Completions protocol, so the target model must also be open to this endpoint. Configurations that only support Anthropic Messages or OpenAI Responses cannot be directly filled in.
Note: Do not expose the complete Key in articles, screenshots, chat records, or public repositories. If you suspect that the Key has been leaked, please immediately delete the old Key, create a new Key, and update the WorkBuddy configuration.
2. Configure B.AI API Through the Interface
Step 1: Open Custom Model Configuration
Open WorkBuddy, click on the account avatar in the lower left corner, and select "Settings."
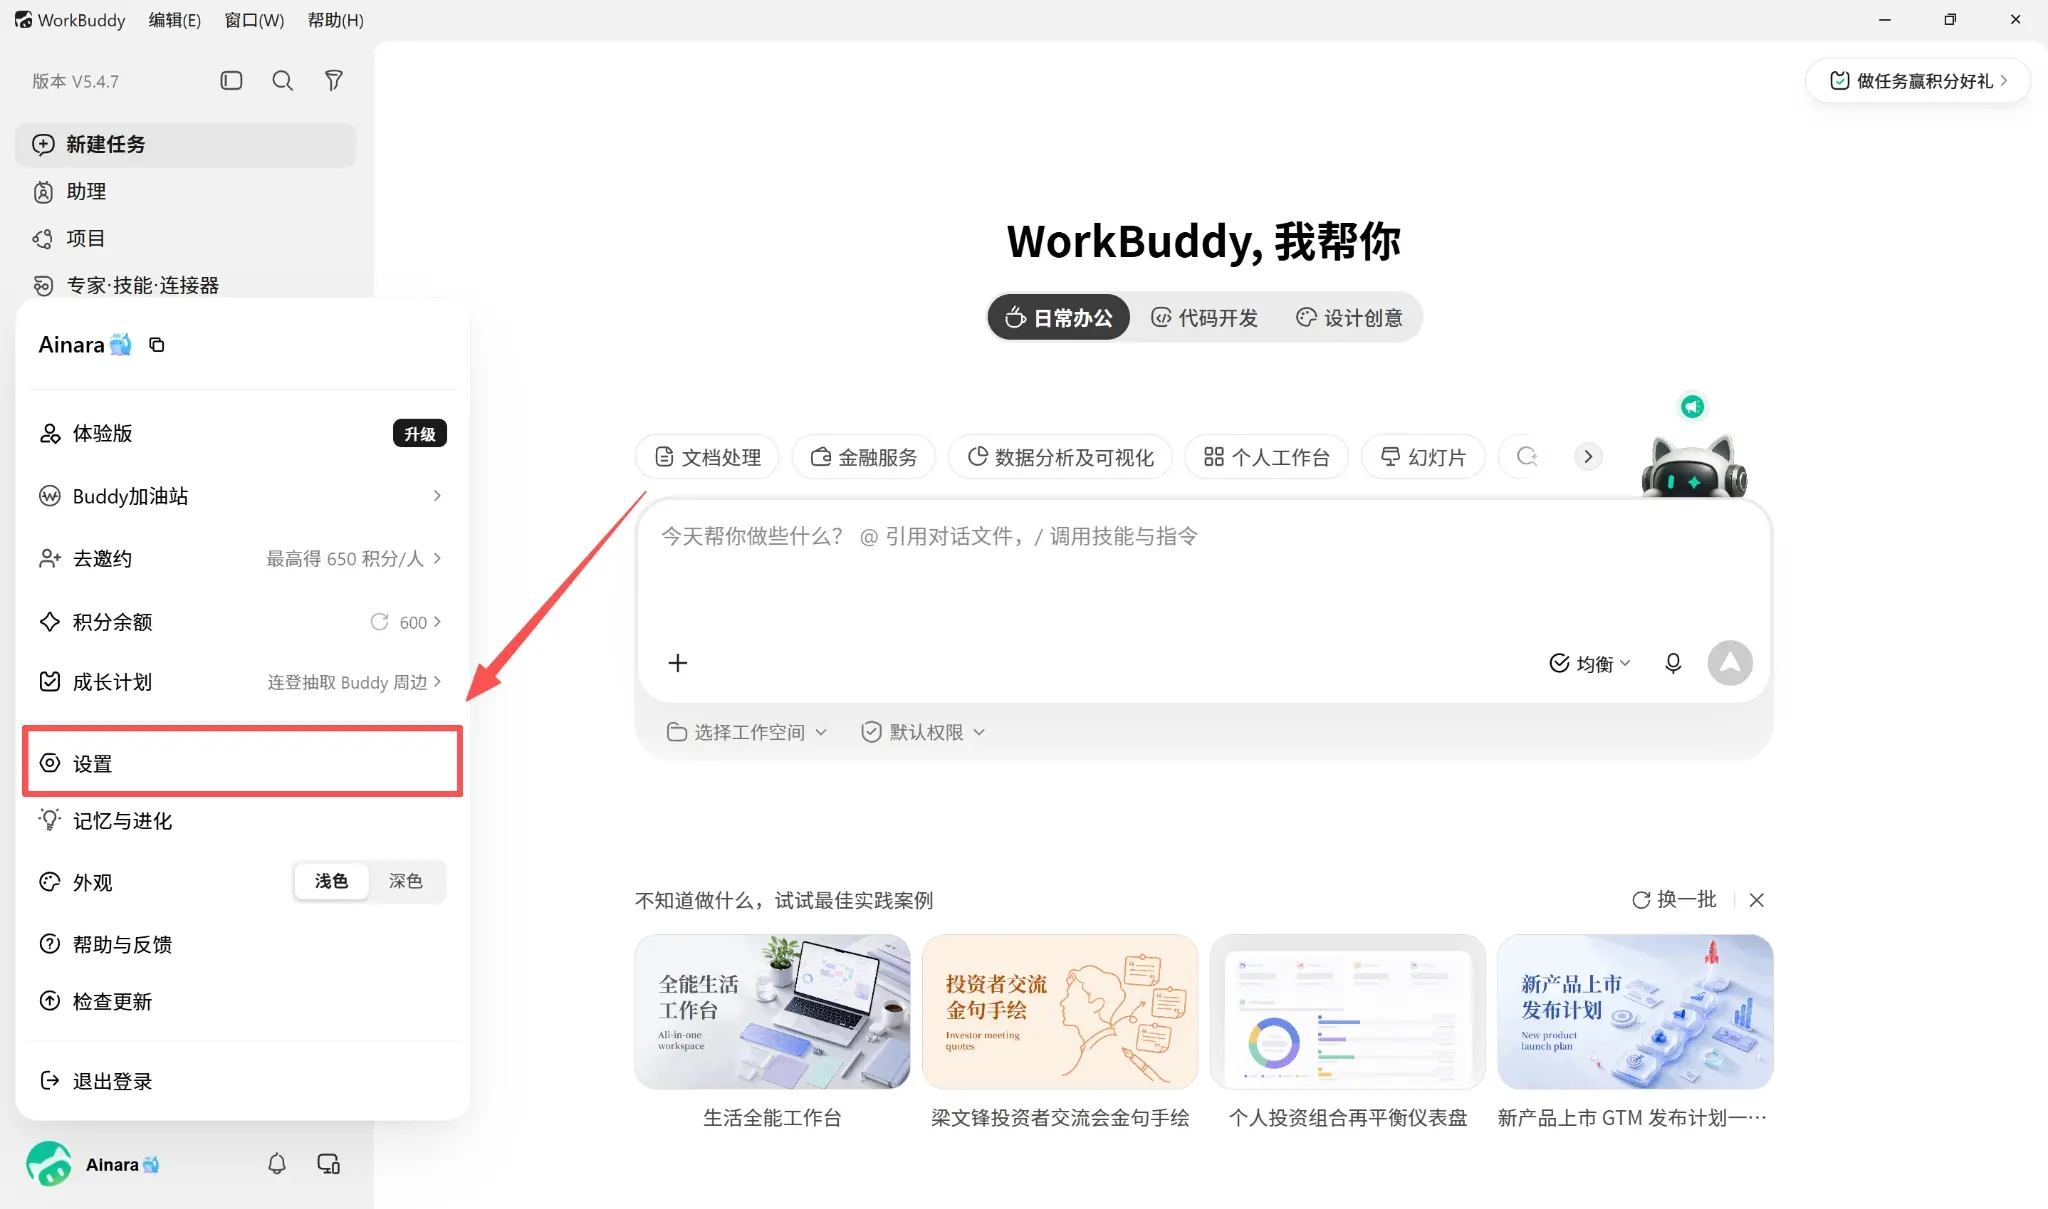
Select "Models" on the left and click "Add Model."
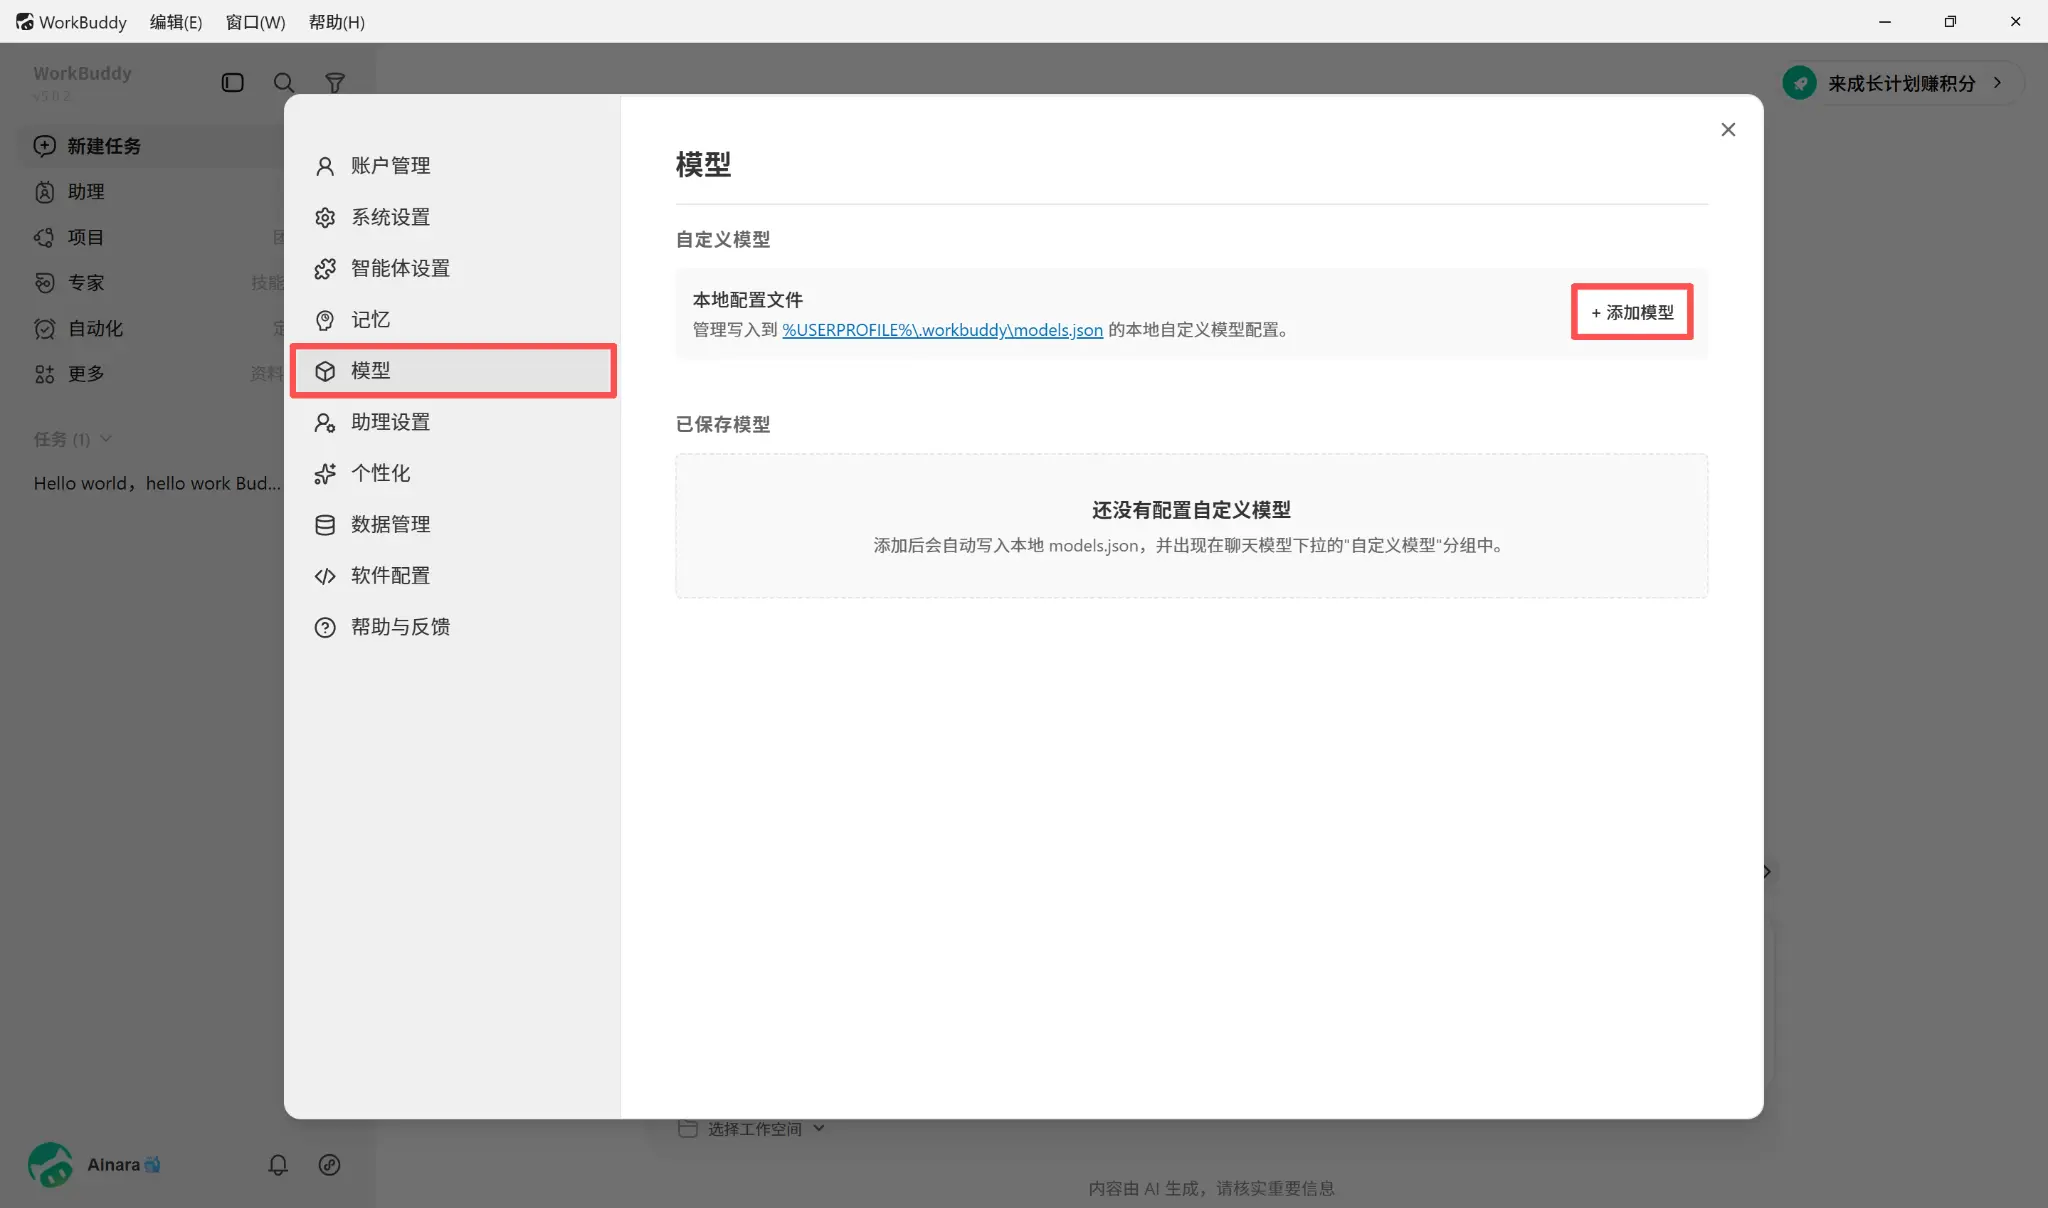
If there are other custom models already in the current list, please ensure to click "Add Model" to create a new configuration, and do not directly overwrite the parameters of unrelated models. If you need to modify an existing B.AI model, simply click the pencil icon next to that model. If you wish to keep the old model while making modifications, you should add a new configuration as a completely new model.
Step 2: Fill in Access Parameters
In the "Provider" dropdown list, select "Custom," and fill in the relevant information on the pop-up page.
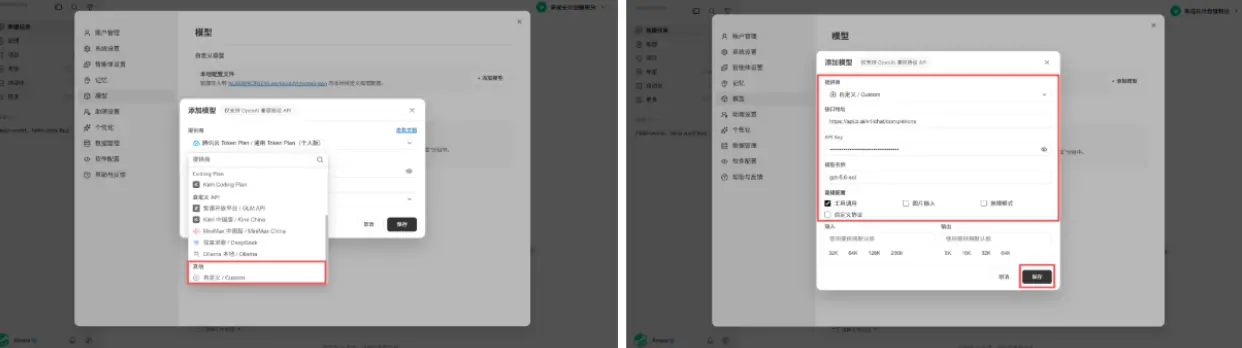
Filling instructions are as follows:

The URL and "Custom Protocol" must be set in pairs:
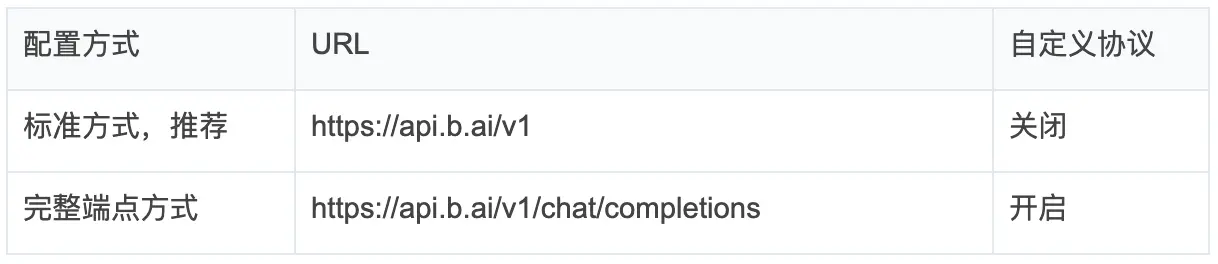
According to WorkBuddy's official documentation, when the "Custom Protocol" is turned off, the client will automatically append the /chat/completions path to the end of the filled URL according to the standard OpenAI Chat Completions rules; when this switch is turned on, the client will directly send requests to the complete URL you filled in without any path concatenation. Be careful not to mix the two methods. Repeated concatenation into /v1/chat/completions/chat/completions will usually return a 404.
Step 3: Set Model Capabilities
The switches in "Advanced Settings" are only used to declare model capabilities; checking them will not automatically grant capabilities to models that do not originally support them. Please configure according to the actual situation, referring to the following principles:
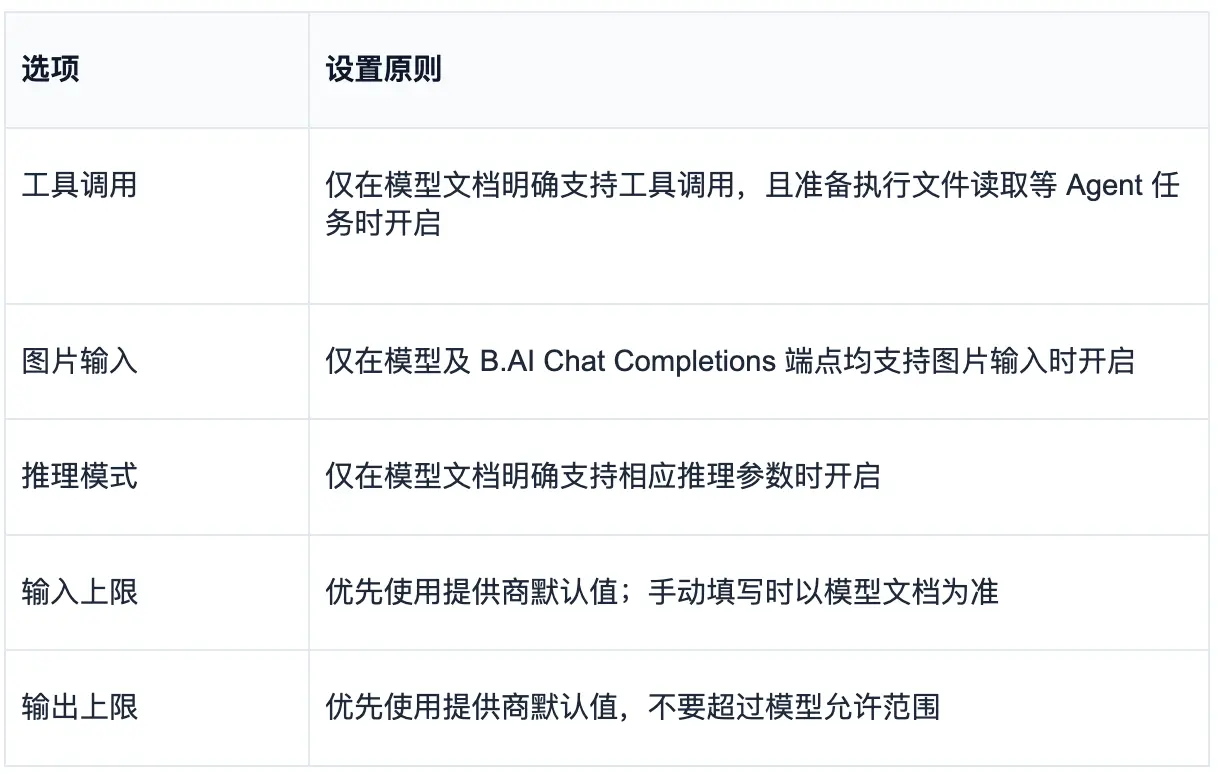 If you cannot confirm the input and output limits, keep "Use Provider Default Values." Do not enable all capabilities by default without documentation or practical confirmation.
Step 4: Save Configuration
After checking the URL, API Key, and model ID, click "Save." The new model should appear in the "Saved Models" list.
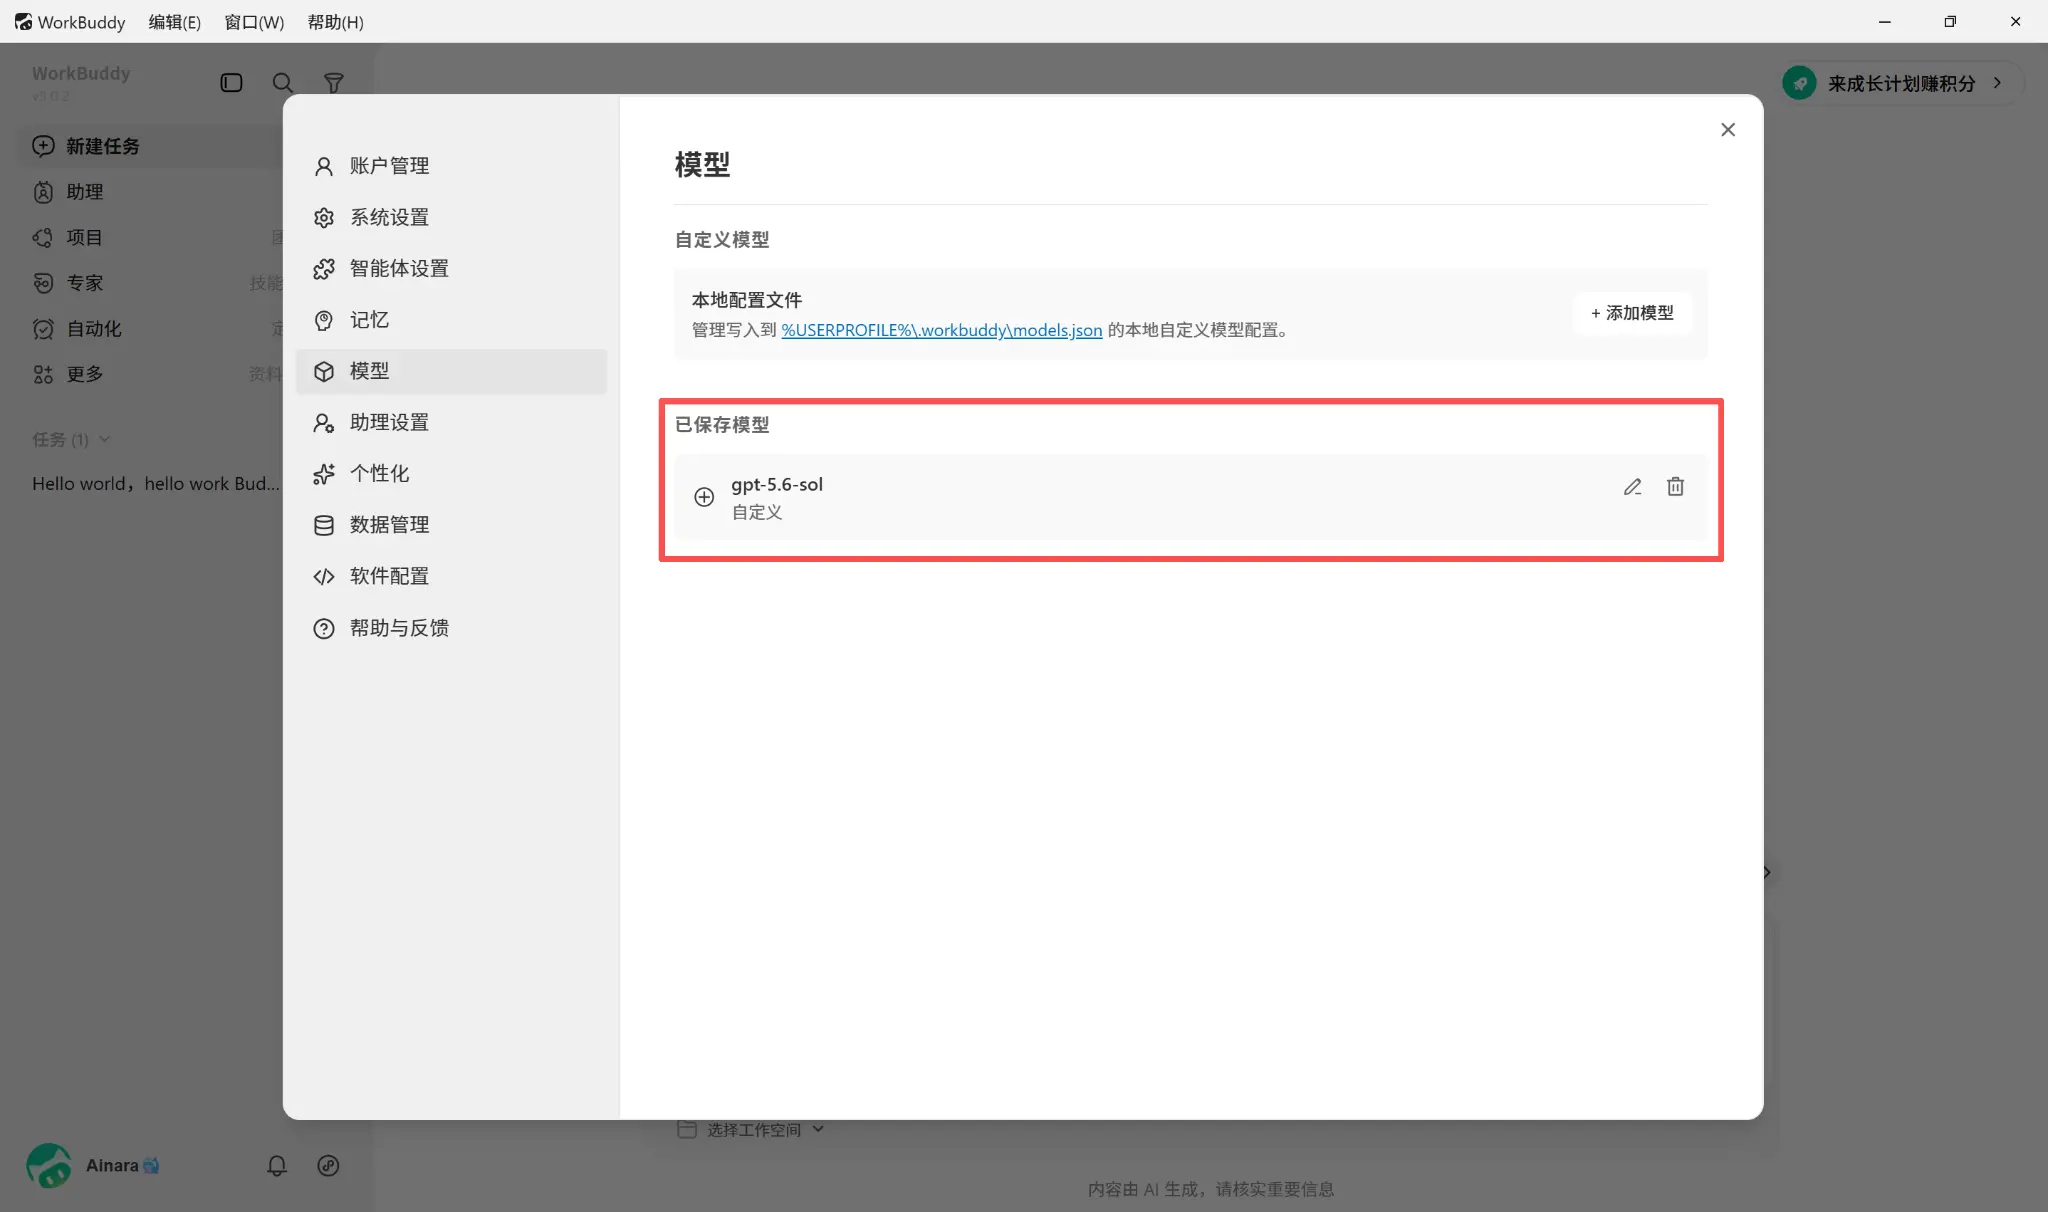
If it does not display, check whether the save pop-up is still open, whether there are errors in the fields, whether the model selector has refreshed, and whether the client version is correct. If necessary, completely exit WorkBuddy and restart it. The model appearing in the list only indicates that the configuration has been saved; it does not prove that the B.AI call has been successful, and further verification is still required.
3. Select Model and Verify Configuration
Step 1: Select B.AI Custom Model
Return to "Create Task," open the model selector near the input box, and select the newly added model from the custom model group. During the testing period, do not select "Auto" mode, as "Auto" mode may schedule other models and cannot prove that this request used B.AI.
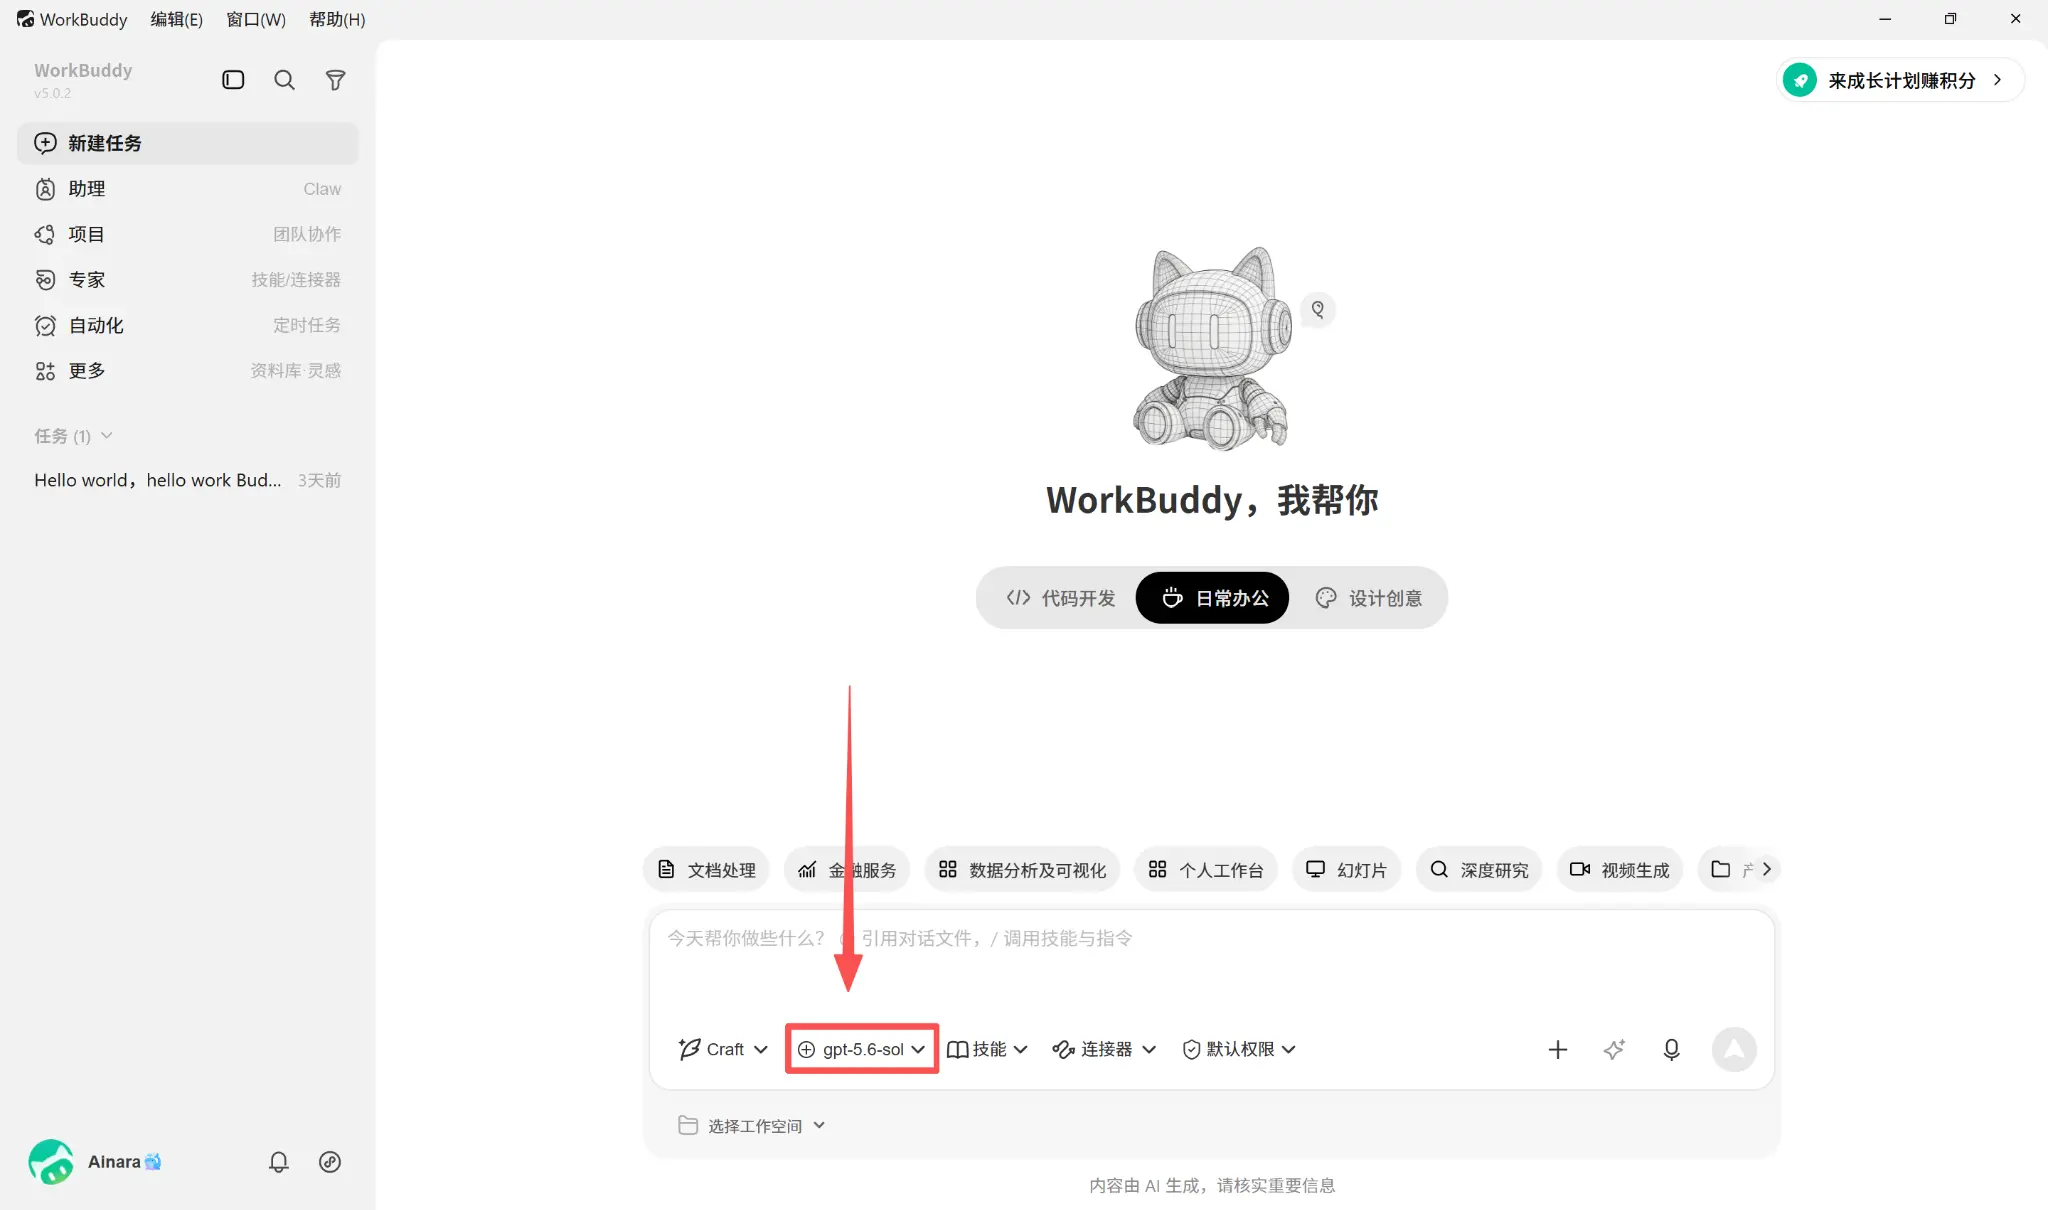
Step 2: Verify Normal Conversation
Send a simple question that does not rely on tools:
Please only reply: B.AI normal conversation test successful
After receiving a normal reply, it indicates that WorkBuddy has read the configuration, and the Key, URL, and model ID can at least complete one text call. If it fails, check in the order of "Current Model → API Key → URL and Protocol Switch → Model ID → Quota and Permissions." Do not determine whether the routing is successful by asking the model "Who are you?" The model's self-reported identity cannot serve as access evidence.
Step 3: Verify Tool Invocation
Please first create a test-only folder, place one or two text files that do not contain private information in it, then select that folder as the workspace in WorkBuddy, and grant only the permissions needed to complete the reading task. Finally, send the following command:
Please read the text files in the current workspace, list the file names, and summarize the content of each in one sentence. Do not modify, move, or delete any files.
WorkBuddy displaying the file reading tool invocation and correctly returning file summaries indicates that the tool invocation chain is available. If it can chat but cannot read files, check tool invocation, model tool invocation capabilities, B.AI endpoint support, and workspace permissions.
Step 4: Check B.AI Call Records
If the B.AI console provides usage or call records, please go check the recent request times, model IDs, request counts, and token consumption to ensure the data matches the recent tests.
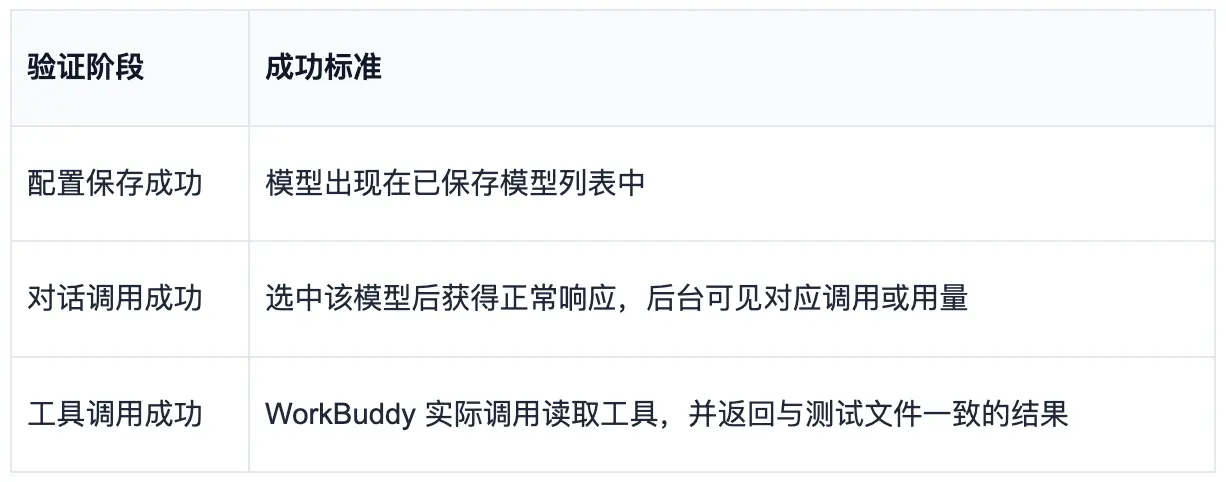
To ensure the entire access process is complete and usable, please verify the success status of the following three stages one by one:
4. Frequently Asked Questions
1. What should I do if I can't find the custom model entry?
It may be because you are not logged in, the client version is outdated, or you are not in the desktop model settings. First, log in, then go to "Settings" → "Models". If you still can't find the entry, select "Check for Updates" to update the client and restart. If the problem persists, submit your version number and a screenshot through "Help and Feedback".
2. What should I do if Windows or macOS cannot install or open?
First, confirm that the system version meets the requirements, the installation package comes from the official page, and check if the downloaded architecture is correct. Follow the security settings process provided by the system to handle any blocks; do not disable security protection or use unknown images.
3. Why is the model not displayed after saving?
First, confirm whether the entry exists in "Saved Models", then close the settings and reopen the model selector. If it still does not display, completely exit and restart WorkBuddy, while also checking for client updates.
4. What do the errors 401, 403, 404, 429 mean, and how can I resolve them?
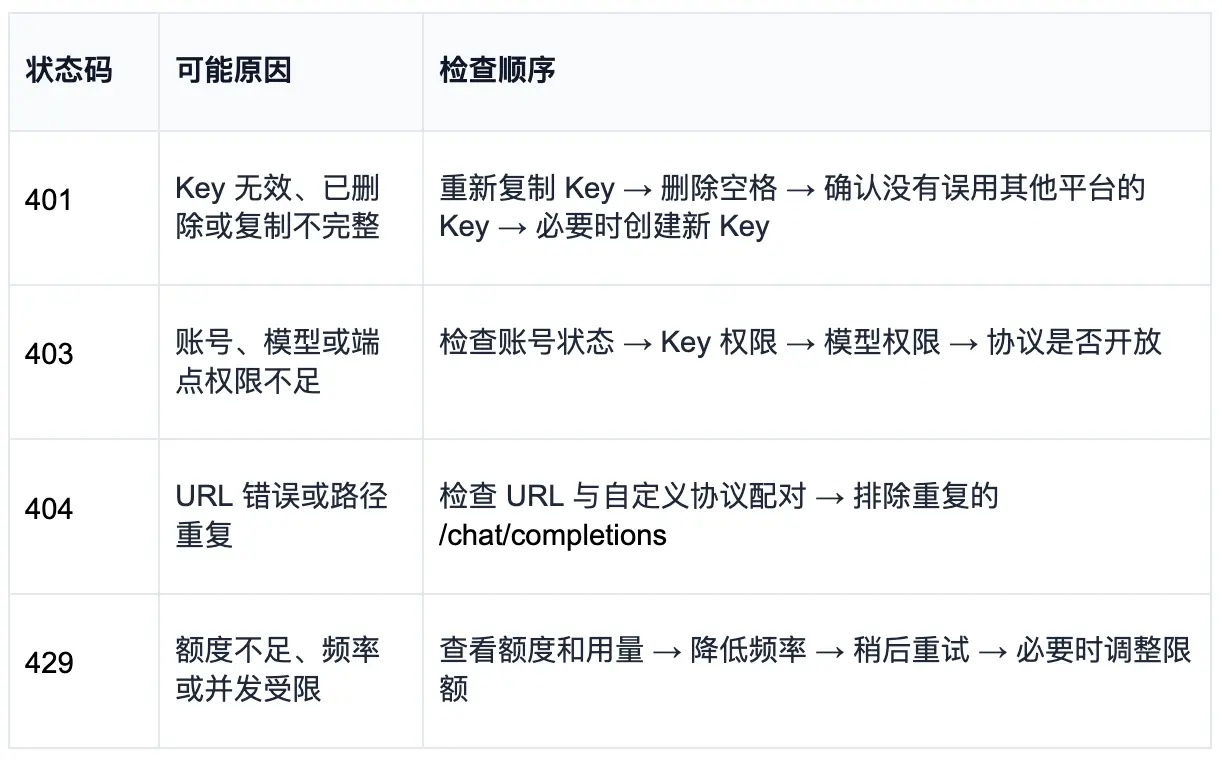
Only modify one item at a time, then retest with a normal conversation to help locate the cause.
5. How can I resolve the "model not found" prompt?
Re-invoke GET /v1/models or check the current console list to copy the correct id. Do not fill in the display name, alias, or version number from other tutorials. Also, confirm that the model is open to the Chat Completions endpoint.
6. What should I do if it keeps loading, times out, or fails to connect?
First, confirm that the network can access https://api.b.ai, then test with a brief question. Next, check the URL, proxy or corporate network policies, B.AI service status, and whether the input file is too large. If the problem persists, record the time it occurred, WorkBuddy version, complete error information, and request ID, then contact official support.
7. What should I do if I can chat but cannot read files?
Check in the order of "Model Capabilities → Tool Calling Switch → Workspace → File Permissions". First, test with a plain text file, and do not directly select system directories, protected directories, or sensitive files.
8. Why is the system still calling the built-in model?
Please check the model selector to ensure it is not in "Auto" mode and that the configured B.AI custom model is explicitly selected. Send a brief question, then go to the B.AI console to verify the call time and usage data. If you still have questions, it is recommended to create a new conversation task for retesting.
9. How do I start it next time after closing the software?
Windows can be started from the Start menu or desktop shortcut, while macOS can be started from Applications or Launchpad. If you do not see the custom model after restarting, first confirm whether the current account is logged in, then go to "Settings" → "Models" to check the list of saved models.
10. Do I need to reconfigure if I change computers?
It is recommended to reconfigure. The WorkBuddy interface indicates that custom models will be written to the local .workbuddy/models.json, and you cannot assume that the API Key and model configuration will sync just by logging into the same account. You should re-add models on the new computer and complete two verifications; do not transfer the Key through chat, public cloud storage, or unencrypted documents.
References:
 Risk warning